
How to Set Application Fee or How to set Destination charges while using Stripe Connect ?Laravel
How to Set Application Fee or How to set Destination charges while using Stripe Connect ?Laravel
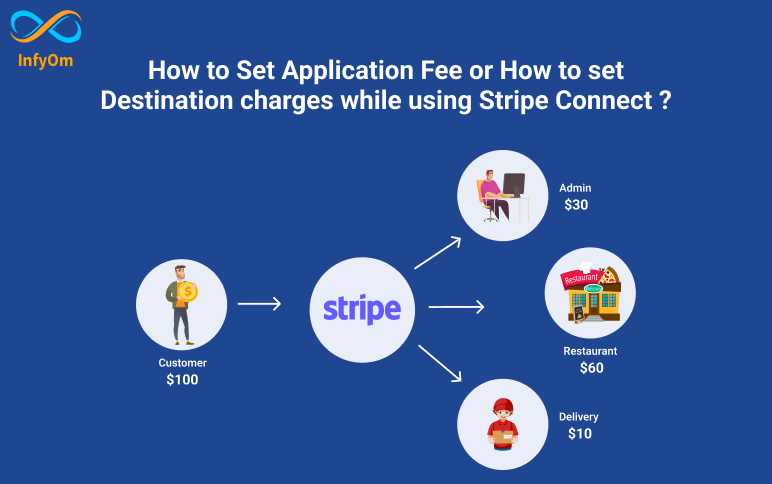
In our previous blog, we had seen how to integrate stripe connect. Now we are going to see how we can split payments to the application and vendor using stripe checkout.
Let's take a simple example :
The platform is "Shopify", Merchant (Who is selling products on Shopify) & Customer who is going to register with Shopify.
Now When a customer purchases a product with $1000, Now $10 will be considered as an application fee, which is going to transfer to the Platform Account and the rest amount $90 will be transferred to Merchant.
Create Session using Stripe Checkout
public function generationSession($data)
{
    $session = \Stripe\Checkout\Session::create([
        'payment_method_types' => ['card'],
        'customer_email'       => $data['email'],
        'line_items'           => [
            [
                'name'     => "item name here",
                'amount'   => floatval($data['amount']) * 100,
                'currency' => 'usd',
                'quantity' => '1',
            ],
        ],
        'client_reference_id'  => $data['reference_id'],
        'success_url'          => url('payment-success').'?session_id={CHECKOUT_SESSION_ID}',
        'cancel_url'           => url('failed-payment?error=payment_cancelled'),
        'payment_intent_data'  => [
            'application_fee_amount' => $data['application_fees'] * 100,
            'transfer_data'          => [
                'destination' => $data['user']->stripe_connect_id,
            ],
        ],
    ]);

    return $session;
}
It will return the session object return, later you can use the session id to redirect to stripe checkout.
Redirect to checkout using StripeJS
        fetch('/generate-sesssion', {
            method: 'POST',
        })
        .then(function(session) {
            return stripe.redirectToCheckout({ sessionId: session.id });
        });
Check the transaction from your Stripe Dashboard
Once you do the transaction successfully, you can verify whether the application fee is applied or not from your stripe dashboard.
Hope this tutorial helps you.
Vishal RibdiyaIntegrate CCAvenue Payment Gateway with LaravelLaravel
Integrate CCAvenue Payment Gateway with LaravelLaravel
This is the hardest thing as a developer I found, as there is no official documentation available to integrate the CCAvenue. Also, you will not find any tutorial or blog from which you can do the implementation.
So, in this tutorial, we are going to cover how we can integrate the CCAvenue payment gateway with Laravel.
web.php
Route::post('purchase', [CCAvenueController::class, purchaseSubscription']);
CCAvenueController.php
public function purchaseSubscription(Request $request)
{
    $input = $request->all();

    $input['amount'] = $data['grandTotal'];
    $input['order_id'] = "123XSDDD456";
    $input['currency'] = "INR";
    $input['redirect_url'] = route('cc-response');
    $input['cancel_url'] = route('cc-response');
    $input['language'] = "EN";
    $input['merchant_id'] = "your-merchant-id";

    $merchant_data = "";

    $working_key = config('cc-avenue.working_key'); //Shared by CCAVENUES
    $access_code = config('cc-avenue.access_code'); //Shared by CCAVENUES

    $input['merchant_param1'] = "some-custom-inputs"; // optional parameter
    $input['merchant_param2'] = "some-custom-inputs"; // optional parameter
    $input['merchant_param3'] = "some-custom-inputs"; // optional parameter
    $input['merchant_param4'] = "some-custom-inputs"; // optional parameter
    $input['merchant_param5'] = "some-custom-inputs"; // optional parameter
    foreach ($input as $key => $value) {
        $merchant_data .= $key . '=' . $value . '&';
    }

    $encrypted_data = $this->encryptCC($merchant_data, $working_key);
    $url = config('cc-avenue.url') . '/transaction/transaction.do?command=initiateTransaction&encRequest=' . $encrypted_data . '&access_code=' . $access_code;

    return redirect($url);
}
Manage Callback
public function ccResponse(Request $request)
{
    try {
        $workingKey = config('cc-avenue.working_key'); //Working Key should be provided here.
        $encResponse = $_POST["encResp"];

        $rcvdString = $this->decryptCC($encResponse, $workingKey);        //Crypto Decryption used as per the specified working key.
        $order_status = "";
        $decryptValues = explode('&', $rcvdString);
        $dataSize = sizeof($decryptValues);
}
Other Encryption functions
public function encryptCC($plainText, $key)
{
    $key = $this->hextobin(md5($key));
    $initVector = pack("C*", 0x00, 0x01, 0x02, 0x03, 0x04, 0x05, 0x06, 0x07, 0x08, 0x09, 0x0a, 0x0b, 0x0c, 0x0d, 0x0e, 0x0f);
    $openMode = openssl_encrypt($plainText, 'AES-128-CBC', $key, OPENSSL_RAW_DATA, $initVector);
    $encryptedText = bin2hex($openMode);
    return $encryptedText;
}

public function decryptCC($encryptedText, $key)
{
    $key = $this->hextobin(md5($key));
    $initVector = pack("C*", 0x00, 0x01, 0x02, 0x03, 0x04, 0x05, 0x06, 0x07, 0x08, 0x09, 0x0a, 0x0b, 0x0c, 0x0d, 0x0e, 0x0f);
    $encryptedText = $this->hextobin($encryptedText);
    $decryptedText = openssl_decrypt($encryptedText, 'AES-128-CBC', $key, OPENSSL_RAW_DATA, $initVector);
    return $decryptedText;
}

public function pkcs5_padCC($plainText, $blockSize)
{
    $pad = $blockSize - (strlen($plainText) % $blockSize);
    return $plainText . str_repeat(chr($pad), $pad);
}

public function hextobin($hexString)
{
    $length = strlen($hexString);
    $binString = "";
    $count = 0;
    while ($count < $length) {
        $subString = substr($hexString, $count, 2);
        $packedString = pack("H*", $subString);
        if ($count == 0) {
            $binString = $packedString;
        } else {
            $binString .= $packedString;
        }

        $count += 2;
    }
    return $binString;
}
That's it.
So that is how you can integrate the CCAvenue Payment Gateway with Laravel.
Vishal RibdiyaHow to integrate Stripe Connect in Laravel / PHP ?Laravel

How to integrate Stripe Connect in Laravel / PHP ?Laravel
Stripe Connect is the fastest way to integrate payment into your marketplace.
In this tutorial we are going to integrate the stripe connect with Laravel.
To integrate the stripe connect you must need the stripe secret and the stripe key. You can get that credentials from your Stripe account.
So let's start integrating...
Installation
composer require srmklive/paypal:~2.0
Onboard the seller using Stripe connect
Define the route for onboarding the seller.
Route::get('onboard-seller', [StripeController::class, 'onboard']);
Now on StripeController.php write the code for the onboarding link.
use Stripe\Stripe;
use Stripe\Account;
use App\Models\User;
use Stripe\AccountLink;

public function onBoard()
{
    $user = Auth::user();

    /** @var User $user */
    if (empty($user->stripe_on_boarding_completed_at)) {
        Stripe::setApiKey(stripeKey());

        if (empty($user->stripe_connect_id)) {
            /** @var Account $account */
            $account = Account::create([
                'type'         => 'express',
                'email'        => $user->email,
                'country'      => 'US',
                'capabilities' => [
                    'card_payments' => ['requested' => true],
                    'transfers'     => ['requested' => true],
                ],
                'settings'     => [
                    'payouts' => [
                        'schedule' => [
                            'interval' => 'manual',
                        ],
                    ],
                ],
            ]);

            $user->stripe_connect_id = $account->id;
            $user->save();
        }

        $user->fresh();

        $onBoardLink = AccountLink::create([
            'account'     => $user->stripe_connect_id,
            'refresh_url' => route('organization.dashboard'),
            'return_url'  => route('stripe.onboard-result', Crypt::encrypt($user->stripe_connect_id)),
            'type'        => 'account_onboarding',
        ]);

        return redirect($onBoardLink->url);
    }


    $loginLink = $this->stripeClient->accounts->createLoginLink($user->stripe_connect_id, []);

    return redirect($loginLink->url);
}
Please note that you have to generate routes for return and cancel URLs.
Once a merchant is successfully onboarded stripe will again redirect him to the return_url
Below you can find the code in which we managed the success callback.
public function onBoardResult($encodedToken)
{
    /** @var User $user */
    $user = User::whereStripeConnectId(Crypt::decrypt($encodedToken))->firstOrFail();

    $user->stripe_on_boarding_completed_at = Carbon::now();
    $user->save();

    return redirect(route('dashboard'));
}
How to create artisan command in Laravel with arguments supportLaravel

How to create artisan command in Laravel with arguments supportLaravel
Create your own Command
In Laravel you can write your own customized command. Generally, commands will be stored in app\Console\Commands.
Generate Command
You can generate a command using the default Laravel artisan command :
php artisan make:command AppointmentReminder
Understanding Command
There is main 2 parts in the console command.
- Signature property
- Handle() method
$signature is the command name where you can specify the command name. if you are giving the name "send:reminder" then you have to fire the full command as follows.
php artisan send:reminder
Defining Arguments
You can define optional and required arguments into curly braces as follow.
  protected $signature = 'send:reminder {appointmentID}';

  // For the Optional argument you have to define ? in last
  'mail:send {appointmentID?}'
Fetching Arguments
After executing the command if the argument is passed you have to fetch it. for that, you can use the default function as follow.
 public function handle(): void
 {
     $appointmentID = $this->argument('appointmeentID');
 }
You can use Options in the same manner as we did for the arguments.
Executing Commands from code
Route::post('/send-reminders', function (string $user) {
     Artisan::call('send:reminder', [
          'appointmentID' => 123
     ]);

     // ...
});
Laravel Jobs - How Jobs works in Laravel?Laravel

Laravel Jobs - How Jobs works in Laravel?Laravel
Out of 100 only 30/40 people know about Laravel jobs and how its works or where we can use it.
When there is a need to use it specifically or the senior team asked that "You have to use Laravel Jobs", generally then people come to the web and search :
- "How Laravel Jobs works ?" Or "Laravel Jobs works in Local Environment?"
In this tutorial, we are going to understand the basic functionality of jobs and their usage in simple words without any complex examples.
What is a Job?
Jobs generally contain a portion of code that runs in the background without blocking any other code.
You first need to create a job and you can write a portion of code into it.
Then you have to dispatch that job.
How Job works?
Let's say we want to send emails to 100 users. In general, terms what we do is: Execute a loop over each user and send emails one by one.
That will definitely take time and we also have to wait for the response.
Overcome that issue by using jobs.
First, we need to create a job that accepts 10 users and sends emails.
Now we will execute a loop over 100 users, so basically we have to dispatch the job 10 times.
So basically 10 times jobs will be dispatched and immediately we will get a response, as jobs run in the background without waiting for any response.
Hope its more clear now.
Vishal RibdiyaA look at what coming to Laravel 10Laravel

A look at what coming to Laravel 10Laravel
I am personally really excited about Laravel 10, are you also excited :) ?. the expected release date for Laravel 10 is 7th February 2023.
In this tutorial, we are going to cover new features and changes from Laravel 10.
Release Date
Laravel 10 will be released by 7th February 2023 and below is a list of annual release dates.
- Laravel 9: February 8th, 2022
- Laravel 10: February 7th, 2023
- Laravel 11: February 6th, 2024
Drop Support for PHP 8.0
Laravel 10 dropping support for PHP <= 8.0, the minimum requirement to run Laravel 10 is PHP 8.1
Deprecations from Laravel 9
In Laravel 10 some of Laravel 9 methods will be deprecated, here is the list.
- Remove various deprecations
- Remove deprecated dates property
- Remove handleDeprecation method
- Remove deprecated assertTimesSent method
- Remove deprecated ScheduleListCommand's $defaultName property
- Remove deprecated Route::home method
- Remove deprecated dispatchNow functionality
Native type declarations in Laravel 10 skeleton
In Laravel 10 the code userland generated by framework will contain the type-hints and return types.
Types will be added into latest PHP type-hinting features to Laravel projects without breaking backward compatibility at the framework level:
- Return types
- Method arguments
- Redundant annotations are removed where possible
- Allow user land types in closure arguments
- Does not include typed properties
Any Many more
Hope that will be usefull.
Vishal RibdiyaLaravel hasOneThough & Laravel hasManyThough RelationshipsLaravel

Laravel hasOneThough & Laravel hasManyThough RelationshipsLaravel
Laravel HasOneTHough & Laravel HasManyThough Relationships
We generally know about the 4 basics Laravel Relations ships that laravel provides:
Now we are going to see the major missing relationships that we are thinking are "Hard to use", but in real cases, it's needed while developing a project.
Even though I was thinking that HasOneThough and HasManyThough Relationships were will be hard to understand, I was wrong. it's really easy to understand.
Understanding HasOneThough
Let's say there is a Library that wants to know the book issuer's name directly, in this case, we generally do :
- Fetch Books
- Fetch its related issuer by using the HasOne Relation
What if I say I can directly access the issuer name into the Library model, yes we can achieve this by using the has one though.
Library
- id
- name

Book
- id
- name
- library_id

Issuer
- id
- name
- book_id
public function issuer() {
return hasOneThough(App\Issuer, App\Book, library_id, book_id)
}Understanding HasManyThough
Let's say in the same example that there are multiple issuers of the same books, we can achieve it as follow.
public function issuer() {
    return hasManyThough(App\Issuer, App\Book, library_id, book_id)
}
Hope it will be helpful.
Thanks
Vishal RibdiyaHow to integrate Paypal payment gateway with Laravel / PHP ?Laravel

How to integrate Paypal payment gateway with Laravel / PHP ?Laravel
How to integrate paypal payment gateway with Laravel / PHP ?
In this tutorial we are going to see to integrate the paypal payment gateway with checkout method using the Laravel.
We are going to use package : https://github.com/srmklive/laravel-paypal
Install the package
composer require srmklive/paypal:~3.0Publish Assets
php artisan vendor:publish --provider "Srmklive\PayPal\Providers\PayPalServiceProvider"Set Paypal credentials into config/paypal.php
return [
    'mode'    => env('PAYPAL_MODE', 'sandbox'), // Can only be 'sandbox' Or 'live'.
    'sandbox' => [
        'client_id'         => env('PAYPAL_SANDBOX_CLIENT_ID', ''),
        'client_secret'     => env('PAYPAL_SANDBOX_CLIENT_SECRET', ''),
        'app_id'            => '',
    ],
    ......
    ......
];
Create Routes
routes/web.php
 Route::get('paypal-onboard', [PaypalController::class, 'onBoard'])->name('paypal.init');
 Route::get('paypal-payment-success', [PaypalController::class, 'success'])->name('paypal.success');
 Route::get('paypal-payment-failed', [PaypalController::class, 'failed'])->name('paypal.failed');
Create Controller
app\Http\Controllers\PaypalController.php
setCurrency('EUR');
        $provider->getAccessToken();
        $data = [
            "intent"              => "CAPTURE",
            "purchase_units"      => [
                [
                    "amount" => [
                        "value"         => 100,
                        "currency_code" => getCurrencyCode(),
                    ],
                ],
            ],
            "application_context" => [
                "cancel_url" => route('user.paypal.failed'),
                "return_url" => route('user.paypal.success'),
            ],
        ];

        $order = $provider->createOrder($data);

        return redirect($order['links'][1]['href']);
    }

    public function failed()
    {
        dd('Your payment has been declend. The payment cancelation page goes here!');
    }

    public function success(Request $request)
    {
        $provider = new PayPal();      // To use express checkout.
        $provider->getAccessToken();
        $token = $request->get('token');

        $orderInfo = $provider->showOrderDetails($token);
        $response = $provider->capturePaymentOrder($token);

        dump($orderInfo);
        dd($response);
    }
}
That's it. Enjoy.
Vishal Ribdiya


